Creating a Transaction Segment using the Websand Segment Wizard
Websand is built for data driven marketing, so segmentation is a key feature within the platform.
The Websand segment wizard allows you to create more advanced transaction based segmentation related to the purchase behaviour of your customers.
A powerful foundation for any cross-selling or upselling activity, to improve your customer retention or drive customer loyalty campaigns.
Return to the Segmentation Page
Introducing Transaction based Segmentation within the Websand Segmentation Wizard
All the marketing event data that is collected whenever you send an email marketing campaign or create marketing automation is made available for you to create segments.
This allows you to really understand how your audience has been reacting to your marketing messages, and manage your data to send reactivation or reminders to those people that have or have not reacted to your marketing.
This section helps you to create some more advanced customer segments within Websand using the ‘Segment Wizard‘.
The transaction based segmentation within the Websand segment wizard allows you to create the extra special segments you need based on the additional data you’ve added to your Websand account.
That’s the data you’ve added in additional to the mandatory ‘transactional’ data of ’email address’, ‘total spent’, ‘item purchased’, ‘transaction_id’ and ‘date of transaction’.
Here’s a typical example.
You collect category information for a product as part of your data collection and process that into Websand with each purchase.
You now need to create a transaction based segment for everyone that has bought a specific category of product such as workwear or fitness clothing. You can’t do that using the product segment, so you need to use the transaction based segmentation part of the Websand segment wizard is the place to create that segment.

Using the transaction based segmentation wizard
Step 1: Getting started with the Websand transaction based segmentation wizard
Select Segment from the Websand Menu and then hit the [+ segment wizard] button in the top right of the screen.
Select Transaction from the segment wizard from segmentation options and that will bring you into the Transaction Segment wizard. Where you can create a ‘freestyle’ segment based on the purchase history of your customer

Step 2: Creating your Transaction Segment using search
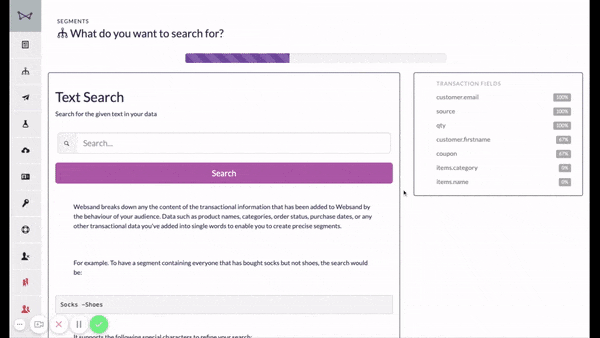
Websand breaks down any the content of the transactional information that has been added to Websand by the behaviour of your audience. Data such as product names, categories, order status, purchase dates, or any other transactional data you’ve added into single words to enable you to create precise segments.
To help you understand more about the ‘Transactional’ profile data you’ve already processed into Websand, we recommend you click on the ‘transaction fields’ in the right column.

Reviewing your data structure
Click on a field in the ‘transaction fields’ column on the right of the screen and a pop-up box will appear containing the top 10 listing of the content for that field.
This function is really useful for data auditing to check the cleanliness of your data and to make sure you use the correct ‘search’ when you create your queries.
Creating your Transaction segment
The segment wizard allows you to create segments based on the content of the data used collected about your audience. To get started, simply type in the query using a single word or words to create the segment that meets your needs. You don’t need to worry about the data fields, the search looks for the content within those fields.
To explain further, consider the query
Sock
As you are using the wizard for transaction based segmentation, this query will select any customer who has a tracked purchase that includes the word ‘sock’.
If you had collected category data, people that had purchased an item with the category ‘sock’ they would also be included, even if the product they purchased didn’t have ‘sock’ in the product name.
This makes the transaction based segmentation wizard very powerful.
But you need have some level of awareness of the data you’ve collected.
Refining your transactional based segmentation
To help you be more specific with your queries, the transaction based segmentation wizard search query supports the following special characters to refine your search, these are explained with examples below.
AND (+) queries
You create an AND query in Websand by using the + symbol. + will create a segment where the customer profile includes both the words you’ve defined in the search.
Socks + Quilts
Would create a transaction based segment that would include people with transactions that contained the words Socks and Quilts.
OR queries
OR will create a transaction based segment where the customer profile includes either or the words you’ve defined in the search
You can create an OR query in Websand by using the | symbol
Socks | Quilts
Would create a transaction based segment that would include people whose profile included the words Socks OR Quilts. This typically creates a much larger segment than an AND query.
NOT (-) queries
If you want to create a transaction based segment which removes people that meet a specified criteria from your search, you need to use a negative segment. You create an negative or NOT query in Websand by using the – symbol. – will create a segment where the customer profile removes the – word from the defined search.
Lamps - Shades
Would create a segment that would include people with a purchase history that included transactions that included the word Lamps but did NOT include the word Shades. These are really useful queries you can build within the transaction based segmentation wizard, that really allow you to drill down into your audience and create segments to power hyper-targeted email marketing campaigns or automation programmes.
Phrase based queries
The phrased search is based on single words, but sometimes you need to create a query based on a phrase. No problem.
If you want to include a search term that includes more than a single word such as Pale Ale, you need to wrap those words in “”. So the correct term to use would be “Pale Ale”
Red + “Air Jordan”
Would create a query for people that had purchased transactions that included the words “Red” and “Air Jordan” within their profile.
If you created a transaction based segment using the query…
Red + Air Jordan
Without the “”, the transaction based segmentation wizard would not consider Air Jordan as a phrase. So the query is likely to create a different result to a query that includes “Air Jordan”.
When running the transaction based segmentation, Websand would look for transactions that included the word Red and then Air so it might be a bigger segment than the one that you want to create.
Creating a prefix query
Using * at the end of a term signifies a prefix query. For more complicated queries the prefix is very useful. I often use this when creating postcode based queries, but also very useful for segmenting based on SKU codes. Rather than typing all the postcodes, I can use the prefix to make the query less complicated.
NE1*
Would create a query that includes every person with a purchase that includes NE1, that’s specific to postcodes. In this case, the query would pick up all the postcodes that begin with NE1.
So that would include the postcodes NE1, NE10, NE11, NE12… all the way to NE19.
If wanted to cover the NE postcode region, the query would be as follows:
NE1* | NE2* | NE3* | NE4* | NE5* | NE6* | NE7* | NE8* | NE9*
Creating queries with precedence
If you need to you can use brackets within your query to signify precedence.
(Red - “Air Jordan”) + Bob
Would firstly select those people with purchases that met the criteria of Red NOT (-) “Air Jordan”, (all red things not Air Jordans) and then transactions that included the word Bob within that group.
This is for advanced users so use this query option with care. It’s always recommended to thoroughly test this query with before using the segment in any marketing activity.
Step 3: Select the time frame for the segment
In the previous step, you’ve defined the audience for your segment. In this step you have three different options to create a time rule to your transaction based segmentation.
Date Option 1 – All Time
Select All Time and that will ignore the time rule option and move you to the final screen of the segment wizard.
Date Option 2 – date range
Select the start and end date from the calendar to define the date range of the segment you wish to create.
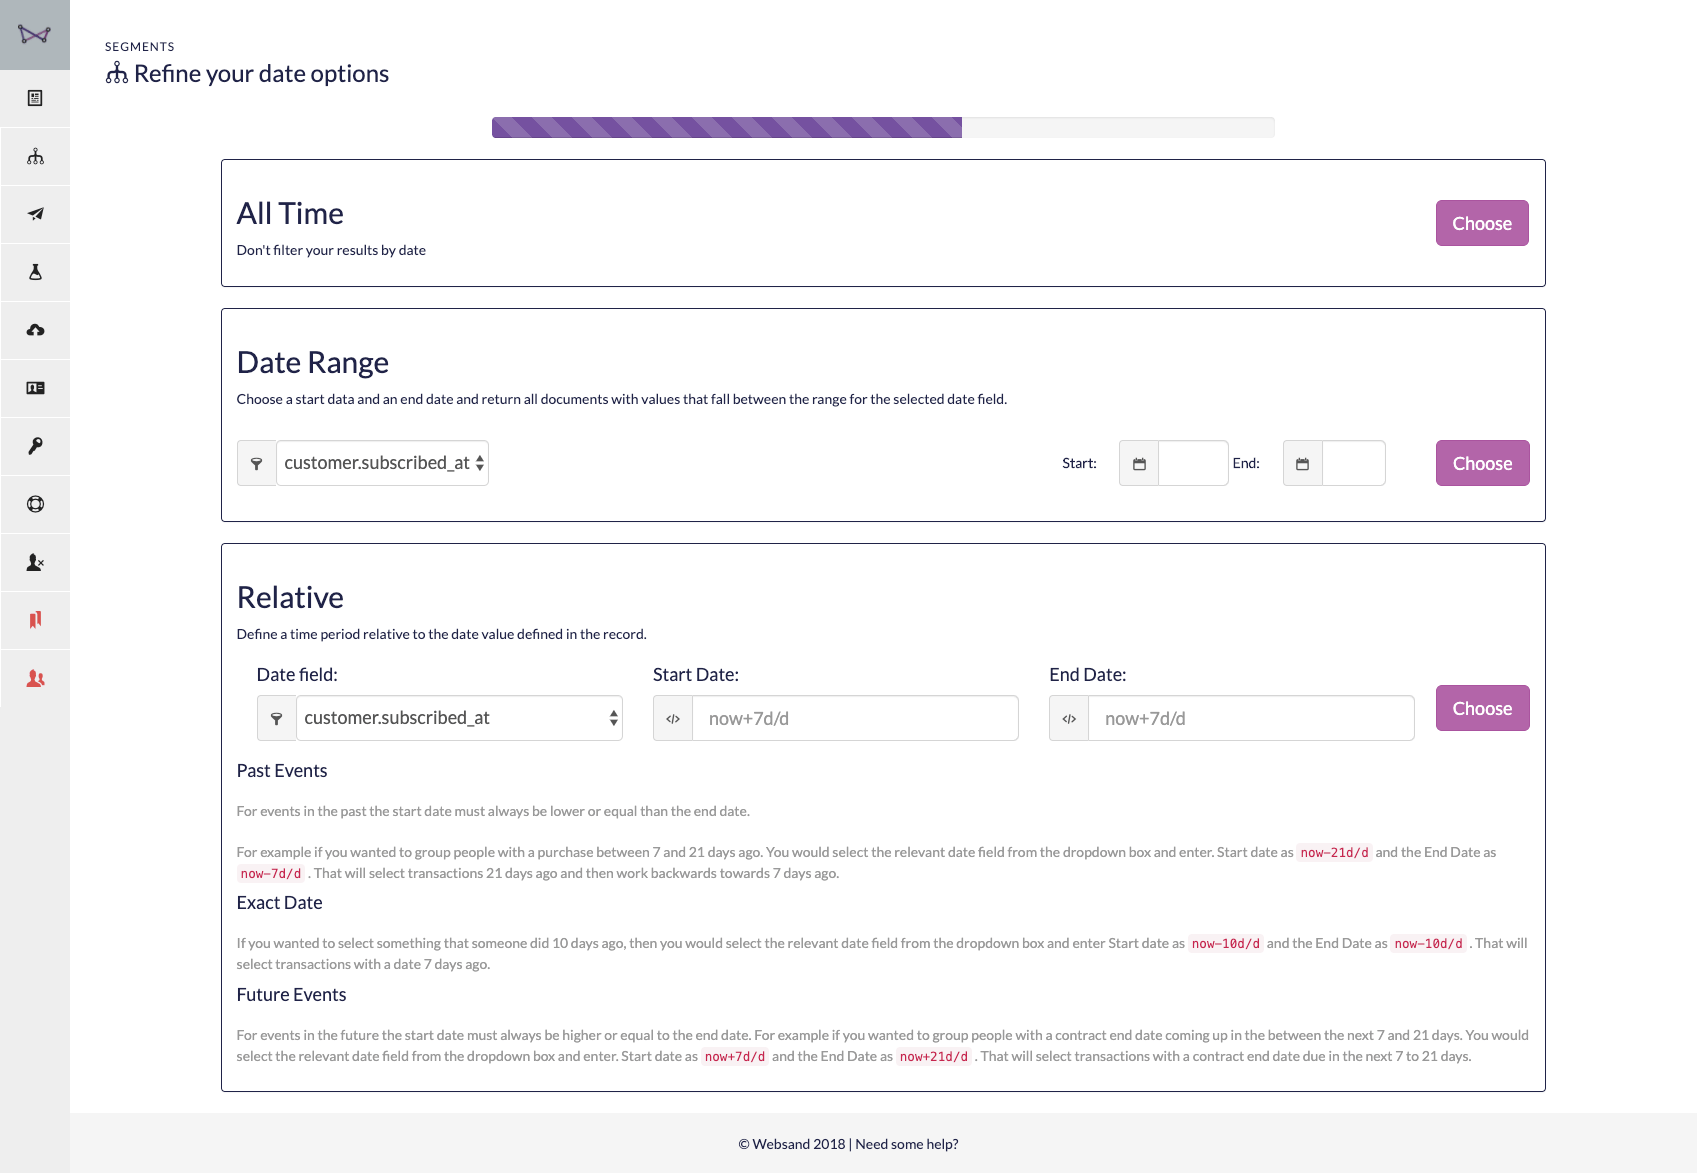
Date option 3: Relative (days since)
Once you’ve selected your source, you can then filter the segment and make it even more dynamic based on the date fields you’ve collected, such as the purchase date of the customer, for your selected product, for example…
Red + “Air Jordan”
This function is ideal when creating segments to power your marketing automations, as the segments update based on audience behaviour.
Set your strategy through the transaction based segmentation, connect marketing communications through automation and your prospect or customer journey will react accordingly.
All based on the transactional behaviour of your audience.
The structure of the query is as follows
> now is mandatory for the query and represents ‘from now‘
> use now- for a time in the past, use now+ for a time in the future.
> the numeric value is the number of days for the query, so now-8d/d would be ‘8 days in the past’.
> all queries should end with d/d that represents that the query is defined in ‘days’

To add a relative date option you need to add a query entry into the start date and end date boxes.
Rules for creating segments for transactions in the past
For events that occured in the past, the start date must always be lower or equal than the end date.
For example if you wanted to group people that purchased between 7 and 21 days ago.
Start date now-21d/d
End Date now-7d/d
That will select everyone that bought something 7 days ago and work backwards towards 21 days ago.
Once in place when someone did the relevant activity 7 days ago, they will meet the criteria of the segment and be included within that segment.
If an automation campaign was connected to that segment they would receive the relevant marketing communication.
Create a segment on an exact day
You don’t always have to use ‘ranges’ of dates.
If you wanted to create a segment based on a transaction that a customer made 10 days ago, you’d use the following query within the relative section.
Start date now-11d/d
End Date now-10d/d
The end date is the earliest part of the segment, so that is the key to creating the query. Once in place when someone did the relevant activity 10 days ago, they will meet the criteria of the segment and be included within that segment.
If an automation campaign was connected to that segment they would receive the relevant marketing communication.
Create a segment for Future Events
For events that will appear in the future, the start date must always be less than the end date.
For example, let’s say you run a subscription business, where you capture the field ‘contact end date‘ for each customer and you wanted to group people with a contract end date coming up in the between the next 7 and 21 days.
You would select the relevant date field from the dropdown box and enter.
> Start date as now+7d/d
> End Date as now+21d/d
That will select everyone with a contract end date due in 7 days time and work forwards towards those that are due 21 days from now.
If an automation campaign was connected to that segment they would receive the relevant marketing communication.
Step 4. Name and create the segment.
Use a name you and your peers can easily understand for your segment, for example – “Bought Red Shoes but not Air Jordans”
Click the ‘create’ button to create your transaction based segment.
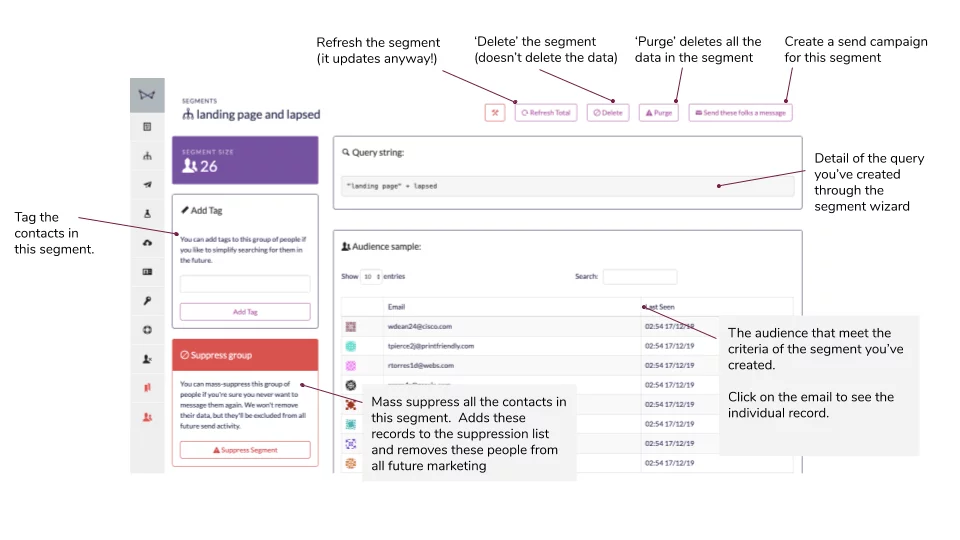
It’s done. You’ve just created a new segment to help you manage your audience. From that day forth (until you decide otherwise), your customers will be segmented accordingly.
Step 5: Review the results
See the list of people that meet the criteria of your segment. Your transaction based segmentation will update dynamically based on the behaviour of your customers. Depending on the criteria of the segment you’ve created, as new data is collected, people either join or leave the segment.
What’s next? Here are some options.
Use this segment power a marketing automation campaign – transactional segments are a great segment to get more sophisticated within your upsell, cross selling or retention programmes.
Monitor this segment as a measure of business intelligence (keep an eye on the growth or shrinkage).
Combine this segment with another segment and create a ‘super-powered segment’.
Or, you use this segment to send a one off marketing message to drive more engagement.
Return to the Segmentation Menu


Need help to get started with segmentation?
If you need more help creating customer segmentation or simply want to know more about how we can help you create data-driven email programmes that perform off the scale, get in touch.
Email support@websand.co.uk or book some time on our calendar.