Sending an email marketing campaign
Design your template, create a sender address and you are ready to send an email marketing campaign using Websand.
Here’s what you need to know and the process you need to follow.
Creating an email marketing campaign
Your data is uploaded and flowing. You’ve created a segment and created a message that is perfectly suited to the audience you’ve selected. Some marketing campaigns are best suited as a single campaign, some are designed to be part of a bigger plan with automation.
This section focuses on a single email marketing campaign. That is a one-off message to your audience. For automation, see creating a marketing automation.
Creating your email marketing campaign
You can create a send campaign from three separate sources; the send screen, the email template screen or the segment screen.
From the Menu
Access the Campaign menu from the Websand menu running down the side of the left of the page.
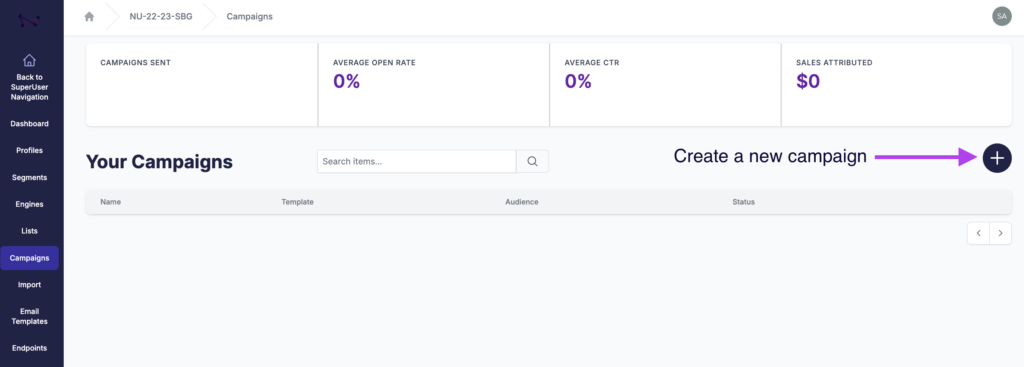
To create a new email marketing campaign, click on the [ + ] button in the top right corner of the screen.
The campaign options will appear from the right of the page.
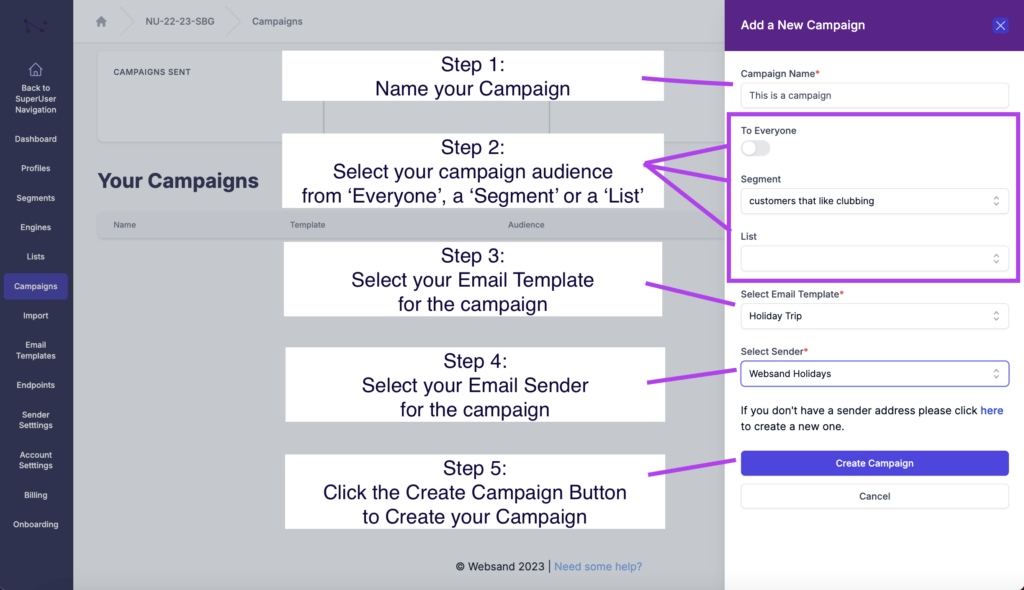
To create a campaign follow these simple steps.
Each step in the campaign setup process explained…
Step 1. Give your Campaign a name (make it specific for historical reference, you’ll thank us later for that tip).
Step 2. Select the audience for your campaign, select from one of the following three options.
- To everyone – that will send your email campaign to the entire audience
- A segment – that will send the campaign to all the contacts that meet the criteria of the selected segment at the time of sending your campaign.
- A List – that will send the campaign to all the contacts in the selected list.
Step 3. Select your template (the email message you’ve created for this automation)
Step 4. Pick your send identity – which email address is this message coming from?
Step 5. Click ‘Create Campaign’ and you will move to the Campaign screen where you can send or schedule the sending of the campaign.
Sending from your segment
If you have already created an email template and created a segment, you can take a shortcut and create a send campaign from the segment view page of the segment you want to use of your email campaign (see below)
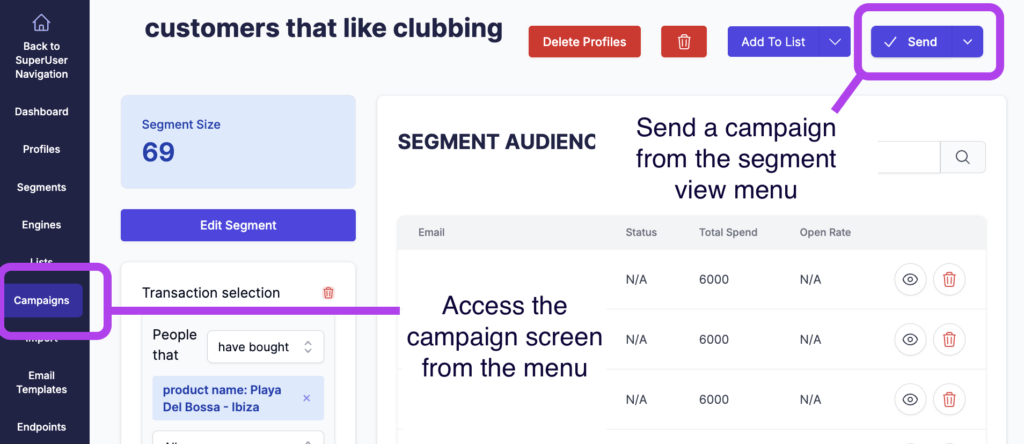
Click on the ‘Send’ button, and you’ll then be directed to the new campaign form with the segment already in place within the campaign form (see below).

Sending your email campaign
Now you’ve selected the audience for your email marketing campaign, created and then selected the right message to send to your audience, and confirmed which sender to use for your campaign. It’s time to get your campaign sent.
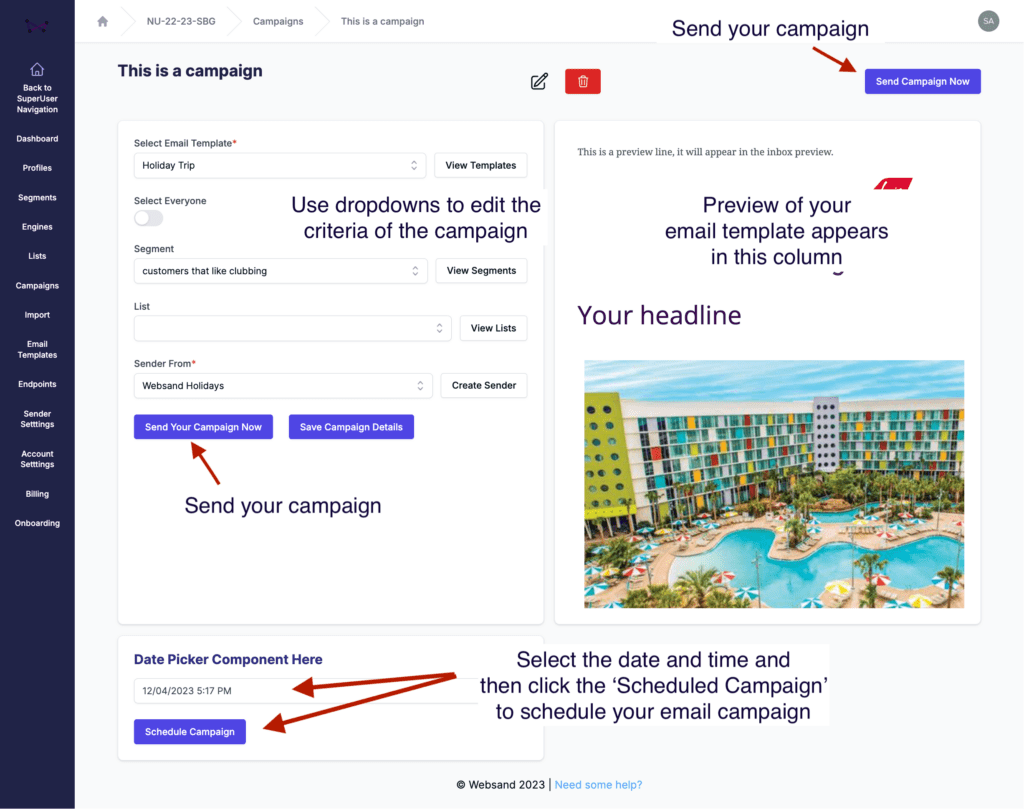
When you first create your campaign, you’ll be sent to the screen below.
Alternatively, you can edit the setup of a saved campaign from the Campaign list – provided that the campaign hasn’t already been sent.
Send your campaign now
To send your email marketing campaign immediately. Simply click on the ‘Send Campaign Now’ button in the Top Right corner of the screen and after the settings on the left column of the screen.
Scheduling a campaign for a future time
To schedule a send campaign, scroll down to the bottom of the screen and then select the date and time you want the campaign to be issued.
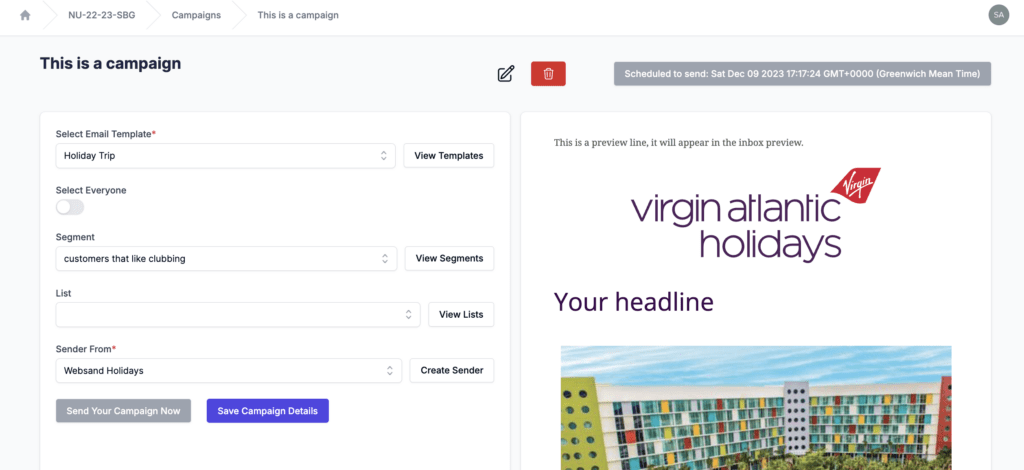
Once scheduled the time for the message sending will appear in the top right corner of the screen in a grey box (see below)
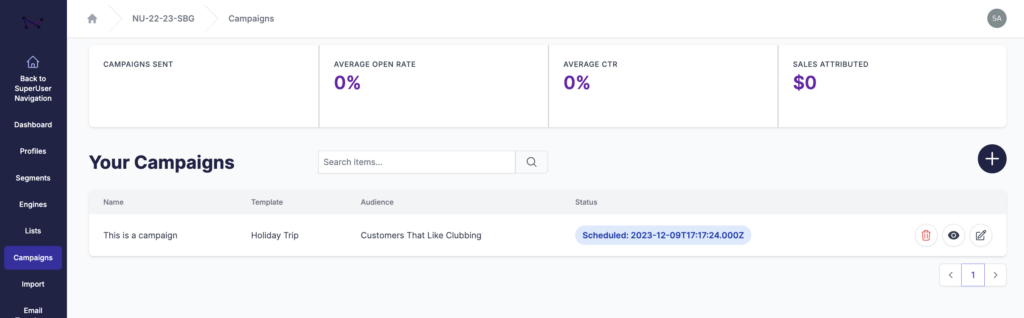
And you’ll also see the status of the campaign as ‘scheduled’ with the date and time in the campaign list (see below)
A note on timezones
Note the time of the message will be scheduled based on UTC (Universal Co-ordinated Time). Learn more about on UTC. To change your time zone click on Account Settings and change the timezone you want to assign to your account.
Reporting on your Campaign
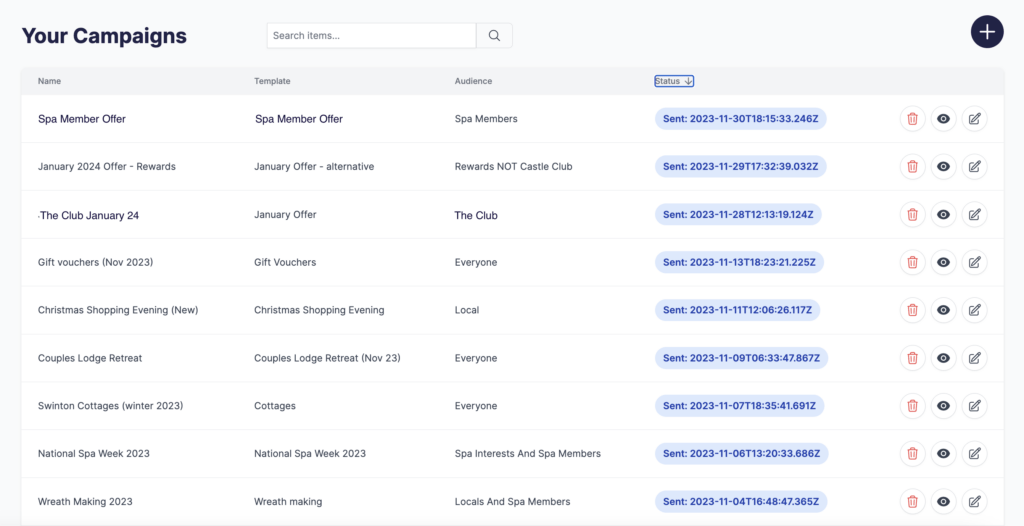
Access all your Send Campaigns from the Send Campaign screen.
The “Status” column shows you the status of each campaign. ‘Sent’ means the campaign has been issued. ”Scheduled’ means that the campaign is scheduled to be sent, Unsent means the campaign is still in the planning stage (not scheduled, not sent).
After your email marketing campaign has been sent, when you click into the campaign you will no longer see the setting of the campaign. You will now see the campaign performance.
If you want to check or view the performance of a previous email marketing campaign, simply click on the name of the campaign from your list of send campaigns.
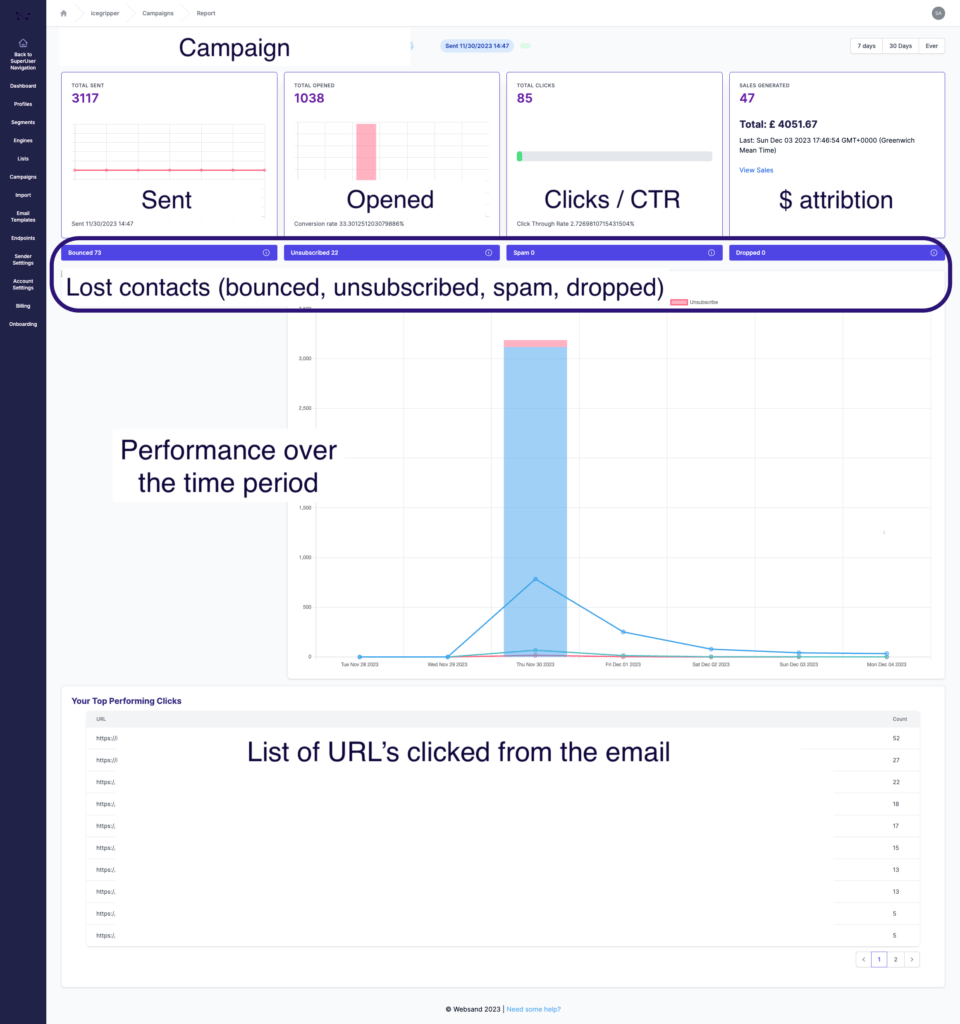
Explaining the email campaign reporting
The reporting table shows the number of people included in the campaign. The number of people who have engaged with the campaign through opening or clicking in the top row, and and those who have unsubscribed or are no longer reachable (bounced) in smaller text in second row.
The report also shows the revenue generated from people who have engaged with the campaign. Click on the ‘View sales’ in the report to review the orders that have been attributed against this campaign.
It also shows a graph of the performance of the campaign over the last 7 days. You can adjust the time period by selecting an alternative in the top right corner of the report.
The Top Performing Clicks lists the number of clicks recorded against every link featured in the campaign. If you want to create a segment to understand who clicks on which link you can do this through the ‘Marketing’ segment for the campaign.
FAQ about email campaign reporting
Here are some of the most asked questions related to email marketing reporting.
Often the number of people included will be less than the total featured in the campaign. That is because any people that have previously unsubscribed will be removed from the segment or audience before the campaign was sent.
Clicking on one of the boxes will create a segment for this audience, e.g. people that have opened that campaign. As with all the segments, that segment will update with every new person that opens the campaign. You can also create a segment for campaigns or automations using the marketing segment
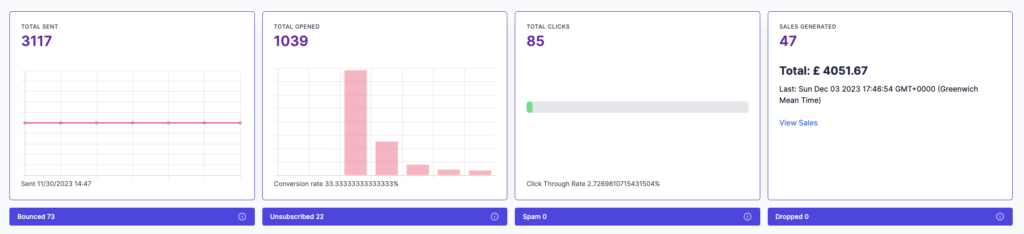
The reporting totals in the boxes at the top of the report show the number of people that have either been included, opened, clicked, bounced, or unsubscribed from the campaign. The ‘Active’ clicks show the number of times someone has clicked on a specific link. Therefore the total of the count in the Active clicks column show the number of clicks recorded against that campaign. This count is usually higher than the number of people that clicked as people often click more than one link if they are engaged in an email marketing campaign.


Need help with your email campaigns?
If you need more help using the Websand platform, or want further help with your email marketing or data strategy. We can help, so please get in touch.
Email support@websand.co.uk or give us a call +44.113.2045925.